Quick Tip: Lock Windows 11 to 24H2 During Onboarding
- Florian Salzmann
- Posted on 16 Sep, 2025
- Updated on 17 Oct, 2025
- 02 Mins read
- Microsoft Intune,PowerShell,Windows 11
When new Windows devices are onboarded to Intune, especially freshly deployed or re-imaged ones, there is a short window before Windows Update for Business (WUfB) or Autopatch fully takes control.
During that time, Windows Update still decides on its own which feature update to install. This can lead to an unintended upgrade to Windows 11 25H2, even if your Feature Update policy is configured to keep devices on 24H2.
Why This Happens
When a device first enrolls, it must register with the Windows Update for Business cloud service.
This registration process usually takes up to several hours, but it can occasionally take up to 24 hours, depending on device activity and communication with Microsoft Update.
Until that registration is completed, the Feature Update policy is not yet applied.
If Windows Update checks for updates during this initial phase, it might already start downloading Windows 11 25H2 before WUfB can enforce your version lock.
How to Prevent This
To avoid this early upgrade, create a Settings Catalog policy in Intune that sets the target version locally before WUfB policies become active.
Option 1: Intune Settings Catalog (recommended)
- Go to Intune > Devices > Configuration > Create Policy
- Platform: Windows 10 and later
- Profile type: Settings catalog
- Search for “Windows Update for Business” and configure:
- Product Version: Windows 11
- Target Release Version: 24H2
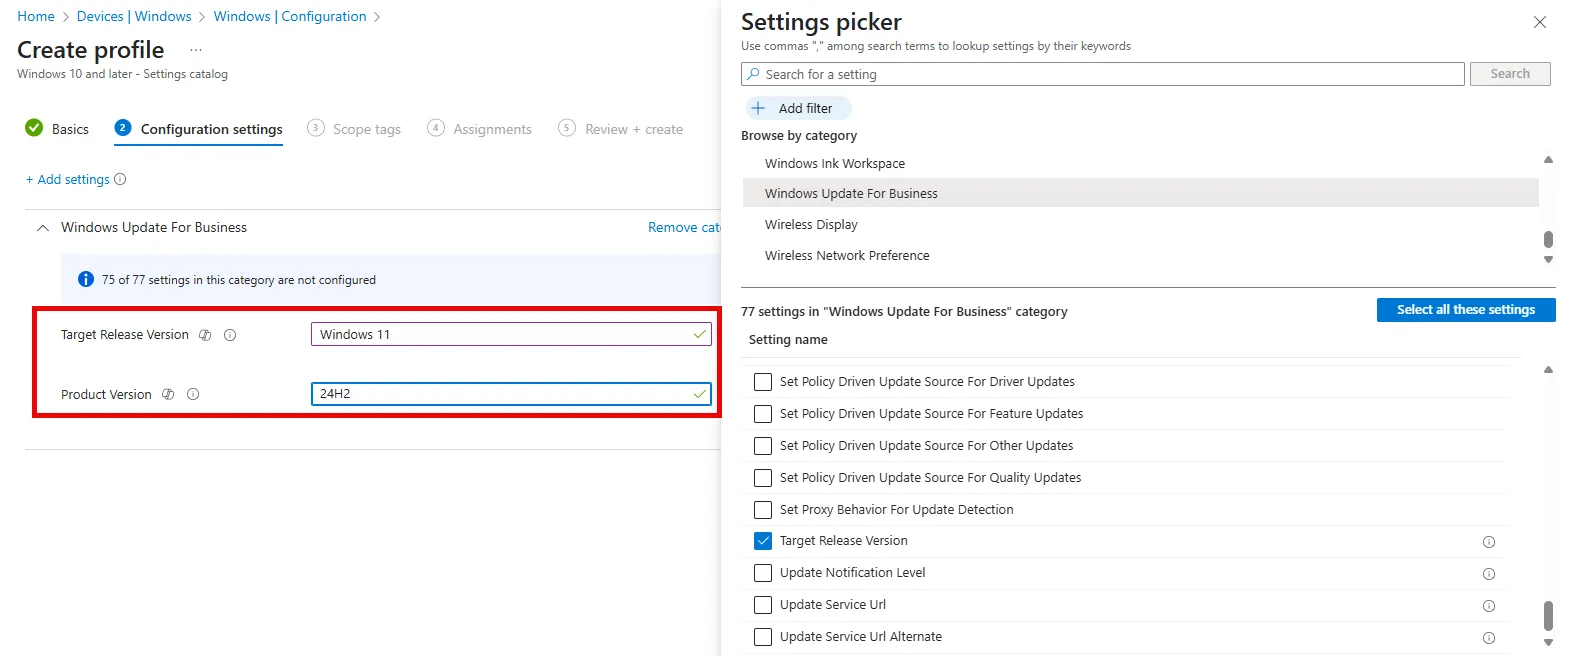
This ensures that any newly enrolled device locally pins itself to Windows 11 24H2 and prevents it from fetching 25H2 updates too early.
Option 2: Registry (.reg file)
Save the following as FeatureUpdate-TargetReleaseVersion-W11_24H2.reg and deploy via your preferred method. Example uses a script, Autopilot task sequence step, or Intune Win32 app.
Windows Registry Editor Version 5.00

[HKEY_LOCAL_MACHINE\SOFTWARE\Policies\Microsoft\Windows\WindowsUpdate]
"ProductVersion"="Windows 11"
"TargetReleaseVersion"=dword:00000001
"TargetReleaseVersionInfo"="24H2"
Option 3: PowerShell
Run locally, in a provisioning step, or via Intune (Platform script or Proactive Remediation).
$path = "HKLM:\SOFTWARE\Policies\Microsoft\Windows\WindowsUpdate"

# Ensure the key exists
if (-not (Test-Path $path)) {
    New-Item -Path $path -Force
}

# Set values
New-ItemProperty -Path $path -Name "ProductVersion" -Value "Windows 11" -PropertyType String -Force
New-ItemProperty -Path $path -Name "TargetReleaseVersion" -Value 1 -PropertyType DWord -Force
New-ItemProperty -Path $path -Name "TargetReleaseVersionInfo" -Value "24H2" -PropertyType String -Force- Use 64-bit PowerShell on 64-bit Windows to avoid registry redirection issues.
Important Notes
Once your Feature Update policy from WUfB or Autopatch is active, it takes precedence over the local TargetReleaseVersion setting.
If both are configured, the cloud policy always wins.
Think of this Settings Catalog policy as a temporary safety layer. It protects devices during onboarding but hands over control once WUfB is active.
If you need more granular control, use filters and/or groups in your Feature Update policies to manage rollout waves for specific device groups.