Introducing IntuneDeviceInventory
- Florian Salzmann
- Posted on 08 Nov, 2022
- Updated on 21 Aug, 2023
- 05 Mins read
- Microsoft Intune,PowerShell,Tools
The PowerShell module IntuneDeviceInventory allows you to add custom fields to Intune device objects. In addition, it included some handy and supportive commands to trigger multiple actions such as a sync or reboot.
I developed the module including the associated UI in cooperation with Jannik Reinhard . If you have feedback on the module / tool, we look forward to a comment or contact via social media.
IntuneDeviceInventory @PSGallery
Install Module
I published the module in the PowerShell Gallery (IntuneDeviceInventory) . You can therefore easily install it on your computer via PowerShell. To do so, enter the following command:
Install-Module -Name IntuneDeviceInventoryFunctions
The module can be divided into three function groups: custom field management functions, bulk action functions and supporting functions.
Authentication
You have two options for authentication. Either you sign in with an Intune Administrator or use Azure App authentication.
User authentication
With user authentication, all you have to do is call up the Connect command and then enter your credentials.
Connect IDI
App authentication
For authentication via app, you must first register an app in Azure AD. This requires the following permissions:
- DeviceManagementManagedDevices.PrivilegedOperations.All
- DeviceManagementManagedDevices.ReadWrite.All
- Group.Read.All
- GroupMember.Read.All
- Organization.Read.All
- User.Read.All
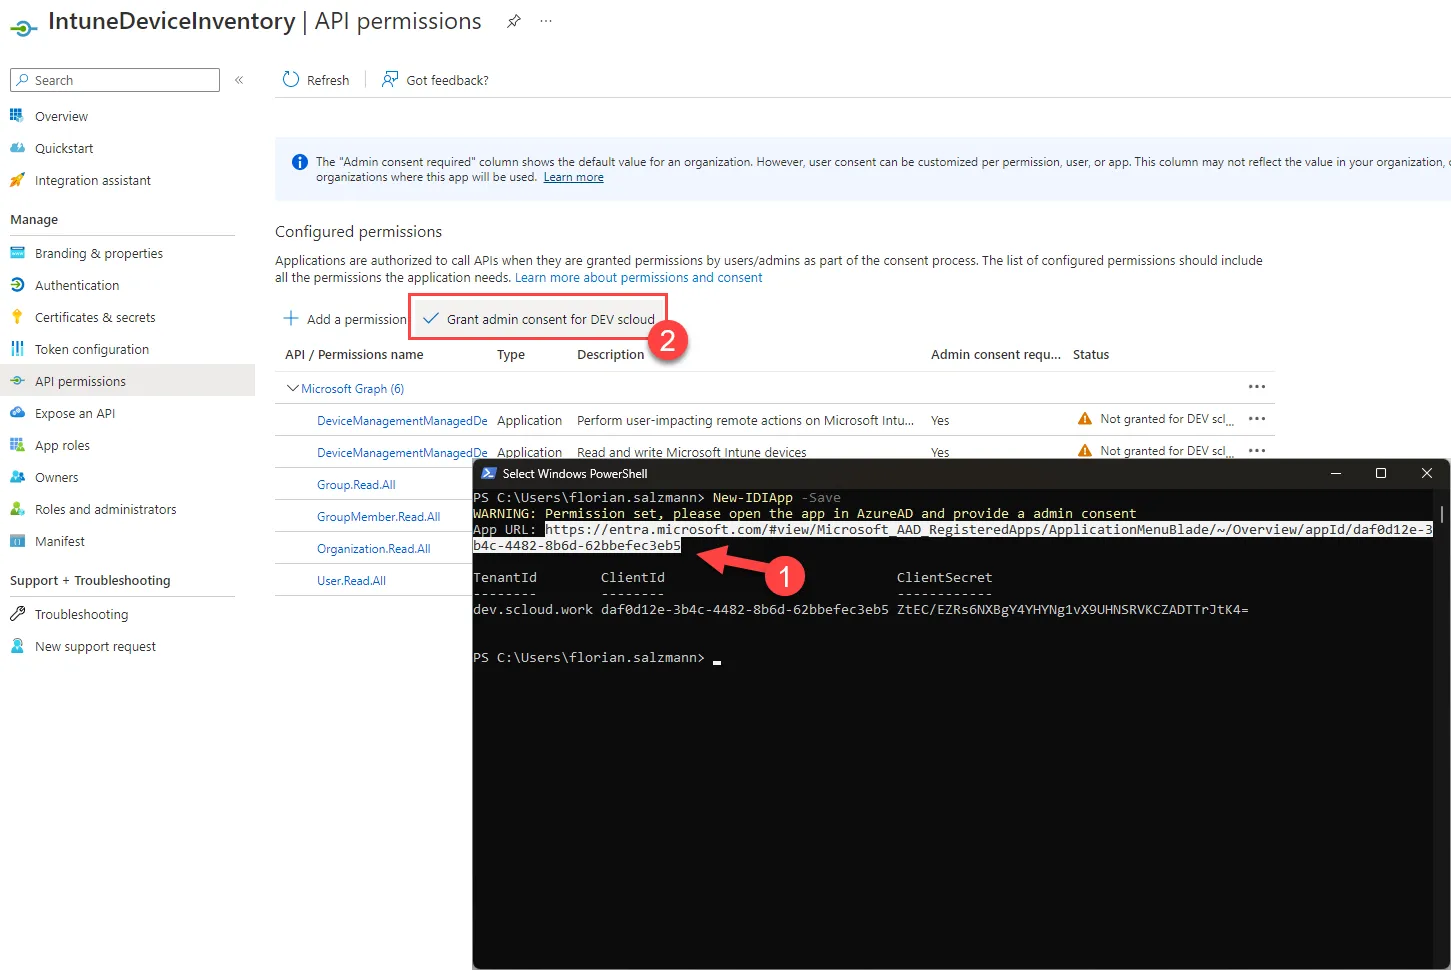
You can either register manually in the Azure or Entra portal (Applications > App registration) or use the function New-IDIApp. With the parameter -Save the connection is stored in encrypted form in your AppData with your user.
If an app already exists and you simply want a new Secret Estellene, use the parameter as well -Force.
# Creates a new App and shows connection details
New-IDIApp

# Creates a new App and saves the details encrypted in the users AppData:
## ("C:\Users\%username%\AppData\Local\IntuneDeviceInventory\AppConnection\TenantId.connection")
New-IDIApp -Save
Even if you do the app registration via PowerShell, you still have to give the “Admin consent” at the end. You will be given the URL after successful creation. After a successful grant, the statuses turn green.
The easiest way to connect to a saved app connection is to call the command Import-IDIAppConnection -Select on. This will show you all saved connections and you can connect with one click.
Alternatively, you can also use the following command with the appropriate app parameters:
Save-IDIAppConnection -ClientId $ClientId -TenantId $TenantId -ClientSecret $ClientSecretManagement of custom fields
The management of the custom fields works best via UI, more on that below.
Of course you can also create and fill in the fields via PowerShell, I show you an example in the demo video.
These are the functions:
- Add-IDIProperty
- Get-IDIDevice
- Set-IDIDevice
Backup & Restore
During the presentation our tool Michael brought up the idea of also installing a “Backup & Restore” function. This is in case something changes in Intune in the future.
… and of course we did. 😉

With the function you can easily save all custom fields in a JSON and import it either to your tenant or to another.
The restore to another tenant is intended for when you need to perform a “tenant to tenant” migration. Then you have the option of not importing the backup using the device ID, but using the serial number. (Parameter -serial)
Bulk actions
Since it is not very practical to carry out an action quickly for several devices in the Intune portal, I have built in the mass actions to carry out actions based on devices or groups, as well as for all devices.
Currently these are these functions, which in turn are in Minor and major can be divided.
The minor functions only do an update or restart of the device major functions, the device can no longer be used after the command has been sent.
- Invoke-IDIDeviceBitLockerRotation
- Invoke-IDIDeviceDefenderScan
- Invoke-IDIDeviceDefenderSignatures
- Invoke-IDIDeviceRestart
- Invoke IDIDeviceSync
- Invoke-IDIDeviceDelete
- Invoke-IDIDeviceRetire
- Invoke-IDIDeviceWipe
You can call all “Invoke” functions with the following parameters:
| Parameter | Beschreibung |
|---|---|
-IDIDevice | Specify a device that you are using Get-IDIDevice have read. |
-Group | members of a group |
-User | UPN of a specific user. Action is performed for all his devices. |
-deviceName | Specific device name. |
-id | Intune Device ID |
-azureADDeviceId | Azure AD Device ID (Used for processing the group members) |
-All | Triggers the action for all Intune devices. |
-Grid | Shows you a “Grid View” in which you can click/select one or more devices. |

-Verbose | You can specify this parameter in addition to another to see the processing of each device. This is especially useful for many devices. |
Here is an example using the Verbos parameter:
And here is a major function. These are only after a confirmation or with the parameter -Force executed.


Supporting functions
All other functions can be found in the repository and contain a description in the header. You shouldn’t have to do anything with these. They are called from the other functions or the UI.
This post does not go into the details of the functions. You can find more detailed descriptions and more examples in the project repository on GitHub or in the demo video below.
I’ve already filled in the “Notes” field! What now?

Don’t worry, you can use the module even if you have already filled the “notes” field with information. There is a function for that called ConvertTo-IDINotes.
With this you can convert the notes for a specific device or all of them into a JSON and make them compatible with the IntuneDeviceInventory.
If you’re not sure if your note fields are compatible, just run the function Get-IDIDevice -All . With that all devices, including the notes, are read out and checked. If a field is not compatible, an error is issued immediately.
You convert all devices with the command ConvertTo-IDINotes -All.
All devices that are already compatible will be skipped with a warning.
UI for the module
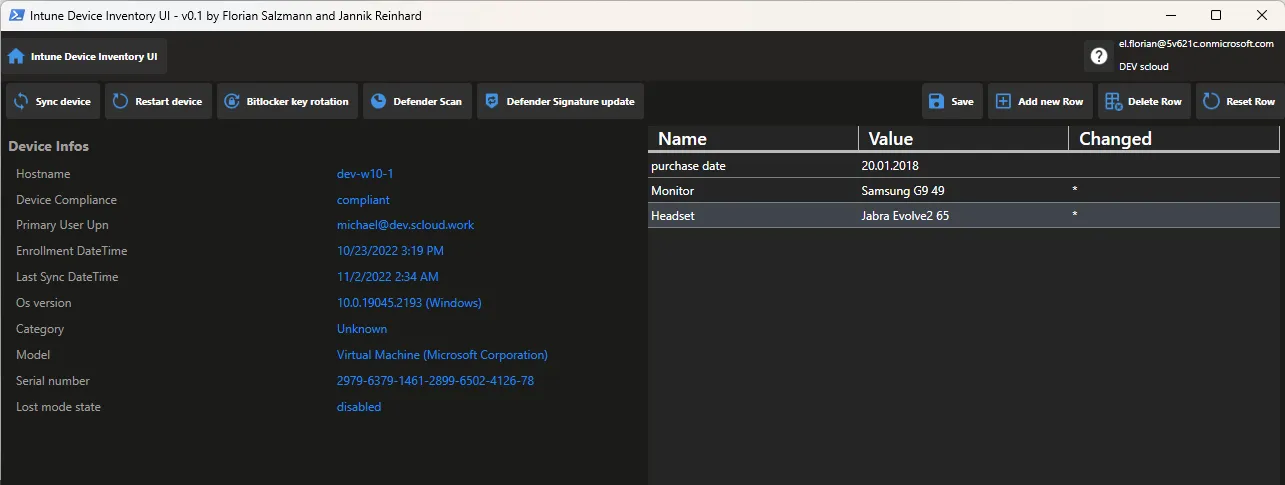
Managing the custom fields via the terminal is not always easy and practical. In order to be able to use the features even more easily, Jannik Reinhard and I have also developed a UI for the module. It’s also published at our GitHub repository.
Here is a small section of the UI, you can find more information by clicking the “UI Introduction” button above.
Demo IntuneDeviceInventory (Terminal)
In the video below I show you how to start with the module and what the basic commands are. You can find more examples in my GitHub repository.
Code samples
Here are the examples from the demo video:
#Installing IDI
Install-Module -Name IntuneDeviceInventory

# Creates a new App and shows connection details
## login with the Admin required (Application administrator, Application developer or Cloud application administrator)
New-IDIApp

# Creates a new App and saves the details encrypted in the users AppData:
## ("C:\Users\%username%\AppData\Local\IntuneDeviceInventory\AppConnection\TenantId.connection")
New-IDIApp -Save

# Creates a new App and saves the details encrypted in the users AppData
# -Force creates a new secret if the app already exists
New-IDIApp -Save -Force

# Lists all aviable/saved connections
Import-IDIAppConnection -All

# Authentication with a saved Azure App
Import-IDIAppConnection -TenantId your.domain.com

# Authentication with a saved Azure App (if you have multiple and want to select)
Import-IDIAppConnection -Select

# Convert existing device notes
ConvertTo-IDINotes -All -PropertyName "purchase date"

# Ge all devices
Get-IDIDevices -All

# Add property
Add-IDIProperty -PropertyName "Monitor"

# Select a device to edit a property
$Device2edit = $IDIDevices_all | Out-GridView -OutputMode Single

# Set device Property
$Device2edit.Monitor = 'Samsung Odyssey G9'

# Update device in Intune with changes
Set-IDIDevice -IDIDevice $Device2edit

# Bulk commands
## Trigger sync for all devices
Invoke-IDIDeviceSync -All

## Trigger reboot for devices in Group "DEV-WIN-Pilot"
Invoke-IDIDeviceRestart -Group "DEV-WIN-Pilot"

## Trigger reboot for devices, selected in GridView
Invoke-IDIDeviceRestart -Grid

## Trigger Defender Signatures update for specific device
Invoke-IDIDeviceDefenderSignatures -deviceName 'dev-w11-1'