
So, you've decided to dive into the world of Intune and take control of managing your organization's devices and apps. Great choice! 🎉
In this blog post, I'll guide you through the process of setting up your Intune environment (primarily for Windows). Let's get started with your Intune setup!
This post is the second part of the "Intune Starter Series"
Table of Contents
- Setup a Tenant with the correct Intune Subscription
- Configuring Intune for First-Time Use
- (dynamic) Device Groups
- Next steps
Setup a Tenant with the correct Intune Subscription
The first step in setting up your Intune environment is to create a Microsoft 365" tenant with a subscription.
If you already have a Microsoft 365 tenant, the only thing you need to check here is that you have an Intune license.
If you're not sure which license you need, "M365 Maps" will give you the best idea. You need one that includes Microsoft Intune.
If you don't manage your tenant or licenses, contact your MSP, CSP or whoever you bought your license from.
As soon as you have the right licensing you should be able to spot a new entry in your Microsoft 365 admin center: "Endpoint Manager" or "Microsoft Intune", depending on your admin center version.
Pro tip: Make sure to familiarize yourself with the different licensing options available for Intune, as they offer varying levels of features and capabilities. The most differences are between the Microsoft 365 Business Premium, Microsoft 365 E3 and Microsoft 365 E5 package.
Configuring Intune for First-Time Use
Now that you have your Intune environment and subscription up and running, it's time to setup Intune for first-time use. Here are some important steps and points to check:
MDM authority
This setting is not necessary in most cases. Especially if you have a new Tenant (created in November 2019 or later).
Intune automatically becomes the MDM authority for all tenants afterward and cannot be modified.
If your tenant is of an earlier version, you will receive a prompt to choose Intune as your MDM authority.
In case you decline to select Intune as your MDM authority, several action controls will be disabled.
If the pop-up doesn't appear and you can't edit the device restrictions or the ESP profile, you can resolve this by setting the 'MDM authority' using PowerShell.
A more detailed explanation and the script can be found here on Rudy's page: Intune MDM Authority greyed out enrollment restrictions (call4cloud.nl)
MDM DNS Records
To use your domain (ex. scloud.work or YourComany.com) for Device registrations you need to set two DNS records. The most convenient way is via the "Microsoft 365 admin center".
Here you can add your Domain or add Intune to an already setup Domain.
To do so follow these steps:
- Open the Menu "Domains" in the Sidebar under "Settings"
- If you don't see your domain here, click "" and follow the steps in the Form
- As soon as you see the Menu for "Add DNS records" make sure under "Advanced options", "Intune" is checked.
This will show you two records to and to your DNS.

Automatic Enrollment
With the automatic enrollment, users can enroll their Windows devices in Intune.
To enroll, users add their work account to their personal devices or join corporate-owned devices to Entra ID (former Azure Active Directory). Behind the scenes, the device registers and joins Entra. Once enrolled, Intune manages the device.
By default, everyone is allowed to do this, and in most cases, this is the recommended approach. This Policy is on a user's bases and not on device types. To limit device enrollment (e.g., blocking personal devices), utilize the "Enrollment device platform restrictions."
You can find the settings for automatic enrollment here:
Intune > Devices > Windows > Windows enrollment > Automatic Enrollment

If you're not sure if the URLs are the default ones, just click on "Restore default MDM URLs" and "Restore default MAM URLs".
If you add a group to the user scope, setup will fail for any Intune devices with users who are not in that group.
Terms and Conditions (for your End-users)
Setting up "Terms and Conditions" is no mandatory step but will be shown to each user while enrolling a new device. So, it can be very handy to provide the user with some information and rules around his new device.
To create the Terms and conditions you have two options:
- Intune
Intune exclusively enforces these Terms and Conditions. - Azure AD / Entra ID
With Azure AD / Entra ID, you have the flexibility of adding terms enforcement to your existing Conditional Access policies or creating new terms policies based on certain user flows.
Terms and Conditions in Intune
To create "Terms and Conditions" for Intune only, navigate to:
Intune > Tenant admin > Terms and conditions


In the tab "Terms" you can define your terms and a summary of those.

Finally don't forget to assign the Terms to a group or all users, depending on your needs:

Terms of use in Azure AD / Entra ID
In Entra ID (former Azure AD) you have a lot more flexibility with your terms and more options to format them according to your CI/CD.
To create them open "Microsoft Entra" and navigate to:
Protection > Conditional Access > Terms of use > and add your new terms

Here you have a few options, including uploading your Terms as a PDF.
If you choose "Custom policy" you will be redirected to create a policy for your Terms.

Now we have our "Terms" in Entra and can use them in our Conditional Access policies:

Device Enrollment Manager
Device Enrollment Manager are users who can enroll more than the default 5 devices in Intune. You can also increase the default of 5 up to 15.
A Device Enrollment Manager (DEM) is a non-administrative user with the capability to enroll devices into Intune. DEMs prove valuable in situations where numerous devices need enrollment and preparation for distribution. Users using a DEM account possess the ability to enroll and oversee up to 1,000 devices, a significant contrast to the 5 (depending on your configuration up to 15) devices an ordinary non-administrative account can enroll.
To establish a DEM account, an Intune user or device license, along with an associated Azure AD user, are prerequisites.
One thing that's often overlooked is that an Autopilot enrolment doesn't count against these limits.
That means in most cases you can skip this step 😉
If you want to dedicate a user, follow these steps:
- Open Intune
- Navigate to:
Devices > Enroll devices > Device enrollment managers > + Add - Add the UPN of the user you wish to promote to an enrollment manager

Enrollment device limit restrictions
There are different scenarios where the "Device limit restrictions" can block an enrollment. Most important is that dies is not the case if you enroll a device through Autopilot.
Microsoft lists all cases here: Understand Intune and Azure AD device limit restrictions - Microsoft Intune | Microsoft Learn
To increase / edit those restriction, which are set to 5 by default and can be increased to up to 15, you can navigate to:
Intune > Devices > Enrollment device limit restrictions
Here you can edit the default policy or add a new one to target a specific group.

Enrollment device platform restrictions
The Enrollment Restrictions are probably the most important ones in this article, cause when properly set, they can save you some headaches in the future.
In short with the "Enrollment device platform restrictions" you define which devices can be joined to your Intune environment. Each OS/Type is divided into "Allow (yes/no)" and "Allow personal (yes/no)".
Normally when starting with a new tenant I block all personal owned devices from joining. With that you make sure not to start any discussion with end users about managing their privat devices. Of course, if needed and communicated you can allow joining certain personal devices.
To edit them navigate to:
Intune > Devices > Enrollment device platform restrictions
Here you can click on the different OS types. The Default policy is in all OS the same.

And here is my default policy to block all personally owned devices:

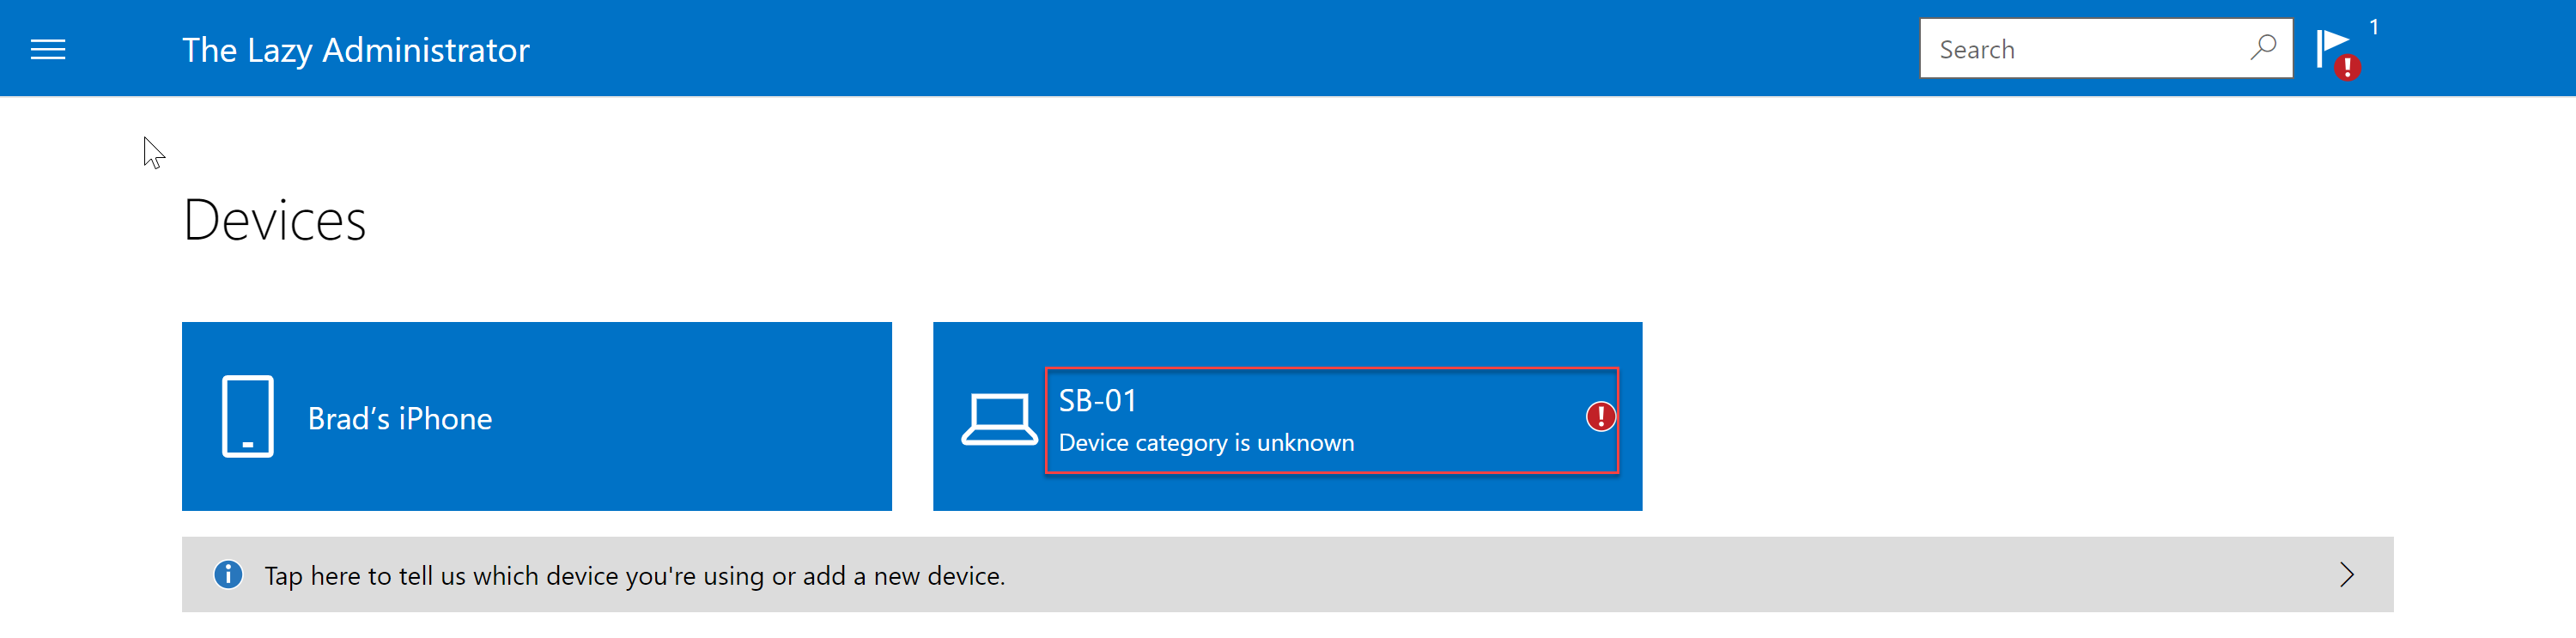
Device Categories
In short... don't use them 😉
When users enroll their Windows devices, they will need to assign a category in the Intune portal which can lead to confusion. If you don't add any categories, you save this step for your users.
If you feel the urge to use them anyway, you can create categories by navigation to:
Intune > Devices > Device categories > + Create device category

Here you can enter a name and description, and that's it. Also note that if you already have registered devices, they will all be prompted to select a category as soon as you create one.
(dynamic) Device Groups
Later we will need to assign groups to our policies and applications. In most settings you have the option of assigning them to 'All users' or 'All devices'. However, it is more practical to have groups where you have the advantage of being able to exclude certain groups from targeting.
Regarding (security) group types we have three sub types:
- Assigned - manually assigned users, devices and groups
- Dynamic User - User assignment based on queries
- Dynamic Device - Devices assignment based on queries
Here are some groups I always use in my environments:
| Name | Description | Query / Assignment |
|---|---|---|
| AAD-DEV-WIN-Autopilot | All Autopilot registered devices | (device.devicePhysicalIDs -any (_ -contains "[ZTDID]")) |
| AAD-DEV-WIN-Standard | Policy for standard apps and configurations | "AAD-DEV-WIN-Autopilot" is a member of this group |
| AAD-DEV-WIN-Pilot | All Autopilot reghistered devices where the "Group tag" contains "-Pilot" | (device.devicePhysicalIds -any (_ -contains "[OrderID]:-Pilot")) |
| AAD-U-Intune | All users with a valid Intune licence | user.assignedPlans -any (assignedPlan.servicePlanId -eq "c1ec4a95-1f05-45b3-a911-aa3fa01094f5" -and assignedPlan.capabilityStatus -eq "Enabled") |
Depending on your naming convention the names can be different, but I'm sure the queries can be of help.
Next steps
Now you have all the prerequisites to enroll your devices in Intune. Of course, there are a lot more things to do for a successful modern workplace like an Autopilot profile, the configuration of the ESP (Enrollment Status Page), Configuration Profiles and Applications.
How you can setup those in Intune I'll show you in my next posts.
Congratulations! 🎉 You've successfully set up your Intune environment and are ready to take control of managing your devices and apps with ease. By following these steps, you've laid a solid foundation for efficient device management.
I hope this guide has made the Intune setup process a breeze for you. If you have any questions or need further assistance, feel free to reach out. Happy managing!


HI, Please do you have a follow post for this post. I really like your post. If you can provide the next steps. Its very clear and I can also use your post for our internal documentation
Next steps
Now you have all the prerequisites to enroll your devices in Intune. Of course, there are a lot more things to do for a successful modern workplace like an Autopilot profile, the configuration of the ESP (Enrollment Status Page), Configuration Profiles and Applications.
Yes, there will be more posts in this series, stay tuned 😀